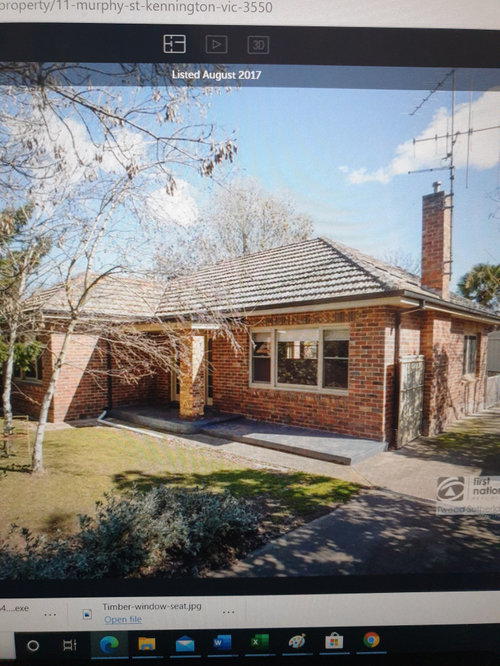
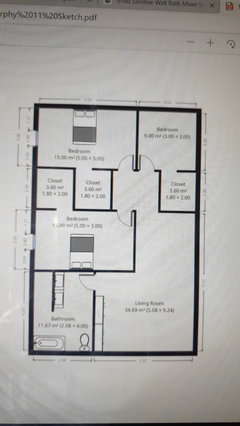
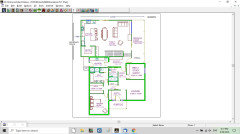
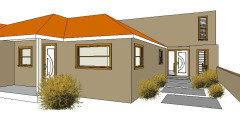
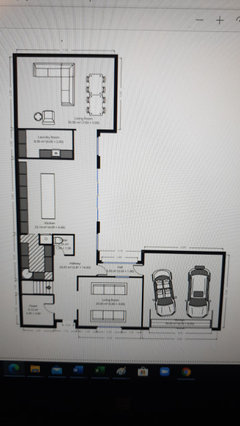
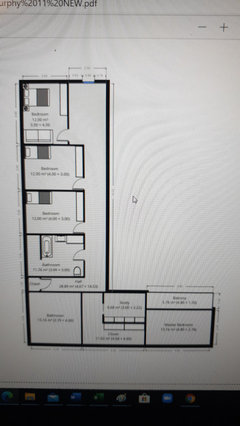
front exterior and extention layout
Marty Hoges
3 years ago


Featured Answer
Sort by:Oldest
Comments (46)
 PRO
PROMB Design & Drafting
3 years ago
Kate
3 years agoRelated Discussions
Looking for help on bedrooms layout
Comments (29)I think the first layout is fine. You might want to consider moving the door for the storage room of the master bedroom so that it opens into the hall. That way the kids can use it for overflow storage. Also, that hallway is big enough that I think it could hold a large armour, providing more closet space. (There's no need to sleep in the same room as your clothes, so long as they're not too far off.) Also, don't forget that while the drawing shows kids in double beds, this need not be the case, so there will be more room for furniture (dressers or whatever) in their rooms. Finally, that step to bedroom 4 will not be odd at all. I've seen it in other homes. It looks clumsy in the drawing but it isn't. What you'll see when you come up the stairs is a bedroom door on a slight diagonal. It's only an odd jagged step if you walk like a robot, in straight lines along the wall, which is what your eye is doing on the drawing but you won't do in real life....See MoreHelp! Two different roof heights and styles... can it be done????
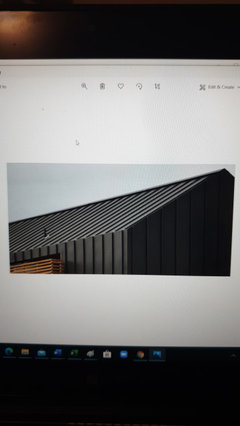
Comments (7)I really don't see an issue with the rooflines. Looks like the angles are fairly similar and the clean lines of both structures should be easy to coordinate, especially in your open, rural setting. Since you've found a stunning deal, I would say, go for it! I definitely would want to find an architect ASAP and by all means, before you pour the slab, make sure you have a plan to coordinate....See MorePlease Help!! How can I arrange/design this small living space?
Comments (13)Try this. Hang the television to the right of the wood stove on the wall opposite the french doors. Use the wall with the high windows for a looong sofa and add two chairs across / angled slightly - low back so you can look over one to television. use console / sofa table on entry /bed door wall just past where entry door opens so you have a lay down surface. Forget glass, it isn't for this era and won't make it feel bigger. Paint ALL french doors inside and out and small windows and entry door same color and trim same color too. Try a charcoal rather than a black - something in the blue-green-gray shades like new providence navy. do all the walls in kitchen and living in a warm white - this tone has the wood as an undertone - http://www.benjaminmoore.com/en-us/paint-color/woodash then, for the cabinets . . do a bungalow thing and go deeper on the cabinets to a classic drabware tone - with the wood walls and floors / try bm bracken biscuit http://www.benjaminmoore.com/en-us/paint-color/brackenbiscuit these will all go together like gangbusters, keep it light and bright but interesting and work with a new blue green gray back door in a tone like bm beach glass http://www.benjaminmoore.com/en-us/paint-color/beachglass templeton gray as a counterpoint on some craigslist piece of furniture . . add warm undertone tan and oatmeal nubby tweed upholstery to start . . the teal navy gray will work with the black iron stove and accents without going black. start keeping the left door to the kitchen closed and get a door stop to hold the other one open permanently . . this will work because you need a little more wall to make the tv work well - in the kitchen, pull your table away from the wall just a tad - consider a padded bench on the wall to provide a kind of sitting space in there and put the chairs across - if you shift your television to the wall (high enough the heat is not an issue , you can still have big speakers work well - and remote the media equipment - run the wire and patch the holes. Hang it mid-height - eye level when you sit plus 15 degrees . . check out the amazing sconces you can put on the entry wall - shades of light petersik pendant with home-made trim wood brace to pump it out from the wall since the power is high? over the console? round wood table in middle - even a hd butcherblock round on a painted drum base in trim tone? With those tones - teal gray, biscuit, creamy off-white, muted blue-greens - paint your white chairs and a hand me down bench wythe blue and find a graphic sunbrella print with a little blue green, chocolate and orange for cushions and pad skirts with velcro at the table . . make a galvinized pipe leg / plank 1 x 12 / clear finish console for behind the door . . now you are cooking with gas . ....See MoreThe Ultimate Investment - Before and After
Comments (0)We began this renovation process, first looking at a range of photos of the bones of the home with our client and about her expectations and "Ultimate Investment Goals" for her project (family home or rental, long occupancy or flicking property, ideal uses, pets bedrooms required etc). We then looked at the structure of the existing home and its potential. With a few tweaks to the layout, we could gain 30sqm and by pushing the exterior wall out at the back and side on the ground floor we could gain another 40 sqm by taking a 3 bed 1 bath single car garage to a 4 bed 3 bath, two lounges and study with double garage. There where some aesthetics that benefited also - the house was brick base with nobly brown brick. Our extension removed most of this and the remainder we rendered, the upper floor cladding was leaking and had a heavy concrete tile over it by changing to weatherboard and tin (longrun) roof the loading's on the existing foundation where similar so no existing foundation needed upgrading. To give it a modern spin we used a block for the fire boundary wall and used stack bond pattern to front and back. Our client Debbie works with raw food as her job, making gluten-free vegan food, so her kitchen space was very important. With the kitchen landing close to an internal corner we decided to make it wider than normal along the back wall hiding a step in the exterior wall and helping connect the two living rooms with a Stainless bench on the island this helped to break up space and provide a central gathering point for entertaining. Finally, we upgraded all the wiring and plumbing and gave it a good paint and carpet throughout. We conducted weekly meetings throughout the entire process of the renovation, not only to discuss options and check we where on the right path with the design but to enable a spread out approach to the loads of decisions that go into a build/renovation. Check out the before and after images below. Along with a video of the final product. Before: After: https://www.youtube.com/watch?v=6CvHS6nNxzk&feature=youtu.be Check out the entire project here!...See More PRO
PRODr Retro House Calls
3 years agoMarty Hoges
3 years agodreamer
3 years agoMarty Hoges
3 years agoMarty Hoges
3 years agooklouise
3 years agolast modified: 3 years agoMarty Hoges
3 years agoMarty Hoges
3 years agoMarty Hoges
3 years agooklouise
3 years agoMarty Hoges
3 years agoMarty Hoges
3 years agoUser
3 years agoMarty Hoges
3 years agoUser
3 years ago
C P
3 years agoJE C
3 years agooklouise
3 years agolast modified: 3 years agoMarty Hoges
3 years agoMarty Hoges
3 years agoMarty Hoges
3 years agoKate
3 years agoMarty Hoges
3 years agooklouise
3 years agolast modified: 3 years agoMarty Hoges
3 years agooklouise
3 years agolast modified: 3 years agoMarty Hoges
3 years agooklouise
3 years agoMarty Hoges
3 years agooklouise
3 years agoMarty Hoges
3 years agooklouise
3 years agoMarty Hoges
3 years ago PRO
PROPaul Di Stefano Design
3 years agome me
3 years ago
differentways
3 years agodifferentways
3 years agoMarty Hoges
3 years agoMarty Hoges
3 years agooklouise
3 years agolast modified: 3 years agoUser
3 years agobigreader
3 years agoKate
3 years ago


Dr Retro House Calls