

Flooring for extension on 1940s house
last year
Featured Answer
Sort by:Oldest
Comments (12)
 last year
- last year
Related Discussions
Hardwood staining & dogs
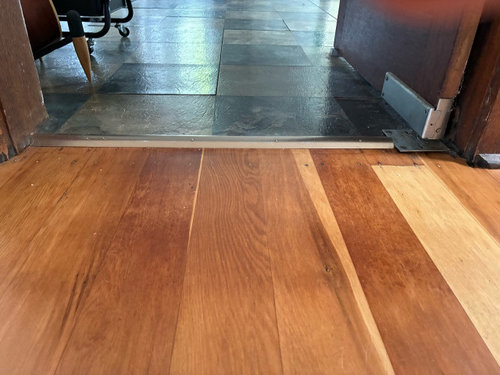
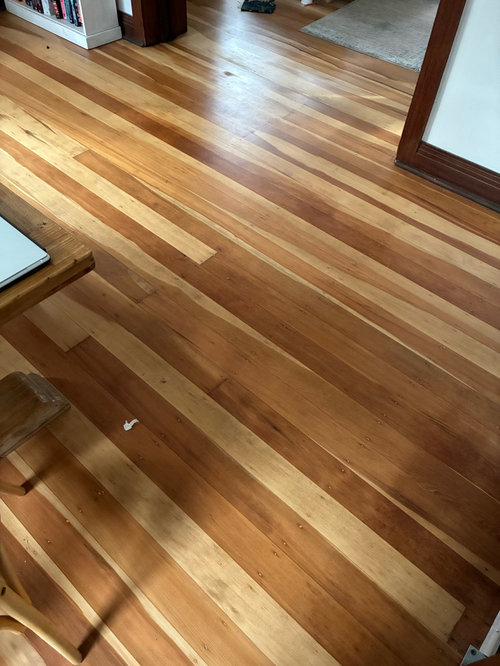
Comments (6)You have "wear through" which is when the finish is pierced and the wood is exposed to the elements. The dark areas are where dirk/water/mud have stained the floor. It is possible to get this out... but probably not all the way. A floor that has wear through needs to be sanded right down, stained (if you wish) and then refinished. Patching can occur...but it is almost always a waste of time because the "look" can be very different from the original sitting right next to it. I don't recommend it for your situation. The second photo shows the deep scratching. Ideally, you would have had your floors looked after BEFORE wear-through occurs. There are some "regular" scratches to the Left in photo 2. You can see it is visible...but no discolouration....THAT is where you draw the line. The darker "wear through" to the Right in photo 2 = too late = full sand and refinish. If you catch it BEFORE wear-through, you can do a "buff and coat". This is a light sanding with a few coats of high end finish over top. The buff and coat is roughly half the price (in Canada at least) as a full sand/refinish. For this reason it is important to catch the floors before you get to this level of scratching.. That being said, you now get to pick some stains (test patch, test patch, test patch). The first photo shows two different woods...you could ask to see if the lighter would could be matched to the darker wood (lots of testing to achieve this). It won't be pefect...but then again you wouldn't have used reclaimed building materials if you were after "perfect". The match can lessen the colour variation to a more manageable (design wise) level. As for "good for dogs" - natural colour of wood = best colour for scratches. A lower gloss (like a satin) can help. You can ask for the "best" finish with scratch resistance that comes in a can. You will pay a premium for it...but it could/should save you thousands of dollars over the long run. A highend, scratch resistant finish means you can get away with the cheaper buff and coats (every 7-12 years...or so) and be able to retain the original (expensive) finish for the full 25 years. The other thing to note: dogs claws require trimming 2-4 PER MONTH when working with hardwoods. This is what the hardwood flooring refers to as "routine" trimming. Some of my clients thought "2-3 PER YEAR" was "routine". I laughed. You have heavy, high energy, powerful dogs. A single lab can cause some damage over time. Two labs can do a number on a floor. Three labs and you have a very short lived hardwood finish. You have 7. I would find the most expensive, scratch resistant finish available in Australia. I would have the maximum amount of finished put your floors (you will pay extra) it and I would budget for a "buff and coat" every 5-7 years....See MorePaint Sprayer advice please
Comments (2)We are in the process of painting every room (3 floors total - UGH). We spent $250 at Lowe's and bought a Graco 0.375-HP Stationary Airless Paint sprayer (model 257025). Worth EVERY stinking penny we paid. Prior to this, we had a Graco HVLP hand-held sprayer that wasn't worth the proverbial "plug nickel". I bought the extension "wand" for our Airless sprayer (we have 9 foot ceilings - otherwise I do NOT recommend it). Bought a smaller tip that sprays 6" wide.... it is MUCH easier for me to control the smaller spray pattern. Maybe by the time I hit floor #3 in painting I'll be using the wider tip that comes with the unit! lol Oh, I use the wide tip NOW when I'm applying the primer - NOT the main colors. Have you every used a paint sprayer? If not, do some research! Most everyone "pro" advises "back-rolling" as you spray (YouTube videos about this too). Blessings to you! Amy...See Moreideas for lights for family room/play room in bungalow
Comments (8)Despite previous opinions I have to say this - DON'T GET DOWN LIGHTS!!!! We had them in our previous home. They were constantly blowing no matter what kind of bulb used. The casings kept breaking. This meant we couldn't just change the bulb ourselves. It drove me mental. They spotlight certain parts of a room instead of lighting the whole room so when one of our main "culprits" kept blowing in the kitchen, I had no lighting above that bench until we could get an electrician in. More than one electrician told us they are a serious fire hazard. I will never have them again!...See MoreThe Ultimate Investment - Before and After
Comments (0)We began this renovation process, first looking at a range of photos of the bones of the home with our client and about her expectations and "Ultimate Investment Goals" for her project (family home or rental, long occupancy or flicking property, ideal uses, pets bedrooms required etc). We then looked at the structure of the existing home and its potential. With a few tweaks to the layout, we could gain 30sqm and by pushing the exterior wall out at the back and side on the ground floor we could gain another 40 sqm by taking a 3 bed 1 bath single car garage to a 4 bed 3 bath, two lounges and study with double garage. There where some aesthetics that benefited also - the house was brick base with nobly brown brick. Our extension removed most of this and the remainder we rendered, the upper floor cladding was leaking and had a heavy concrete tile over it by changing to weatherboard and tin (longrun) roof the loading's on the existing foundation where similar so no existing foundation needed upgrading. To give it a modern spin we used a block for the fire boundary wall and used stack bond pattern to front and back. Our client Debbie works with raw food as her job, making gluten-free vegan food, so her kitchen space was very important. With the kitchen landing close to an internal corner we decided to make it wider than normal along the back wall hiding a step in the exterior wall and helping connect the two living rooms with a Stainless bench on the island this helped to break up space and provide a central gathering point for entertaining. Finally, we upgraded all the wiring and plumbing and gave it a good paint and carpet throughout. We conducted weekly meetings throughout the entire process of the renovation, not only to discuss options and check we where on the right path with the design but to enable a spread out approach to the loads of decisions that go into a build/renovation. Check out the before and after images below. Along with a video of the final product. Before: After: https://www.youtube.com/watch?v=6CvHS6nNxzk&feature=youtu.be Check out the entire project here!...See More last year
- last year
- last year
- last year
- last year
- last year
 PROlast year


bigreader