


Recent Activity
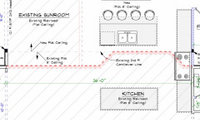

I much prefer the long side of one large island facing the range. Think practically where you are going to prep food in the current layout. The most valuable prep space is next to a water source.
I also hate a cleanup sink on the island, mess on display at all times, no thanks.
My suggestions: I would be moving the range "down" on its wall, then putting the DW and cleanup sink right at the top (DW does not go between range and sink). I would put drawers for dishes in the island facing the DW for ease of putting away.
I would then put a prep sink at the very bottom right cover of the island. You then have a nice spacious prep sink directly across from the range and fridge.
I would also put a pantry cabinet in between the fridge and wall, and maybe on the other side of the fridge too. Alternatively, you could have standard upper-lower-countertop on the left side of the fridge and place the MW there. We put a MW on an open shelf of an upper cabinet right next to the fridge since most things that go into the MW come out of the fridge.

The drawing is hard to get a handle on, spatial estimating and flow is difficult to envision without seeing more of the house to understand furniture and room layout. If you only want an answer about clearance between islands or a stove, that is a recommended dimension as commented, but for advice on how to make the kitchen better there is a lot of unknown info.
The structure seems to not have been fully addressed yet or a lack of information makes it unclear, but it is very consequential to your kitchen design. For instance, an assumption is the red dashed line is the existing back wall of house, that has a bay Breakfast Area, and with a cantilevered 2nd floor (as PPF graphically commented). With that, the entire 26'-0" back wall is to be removed, and a beam is placed also eliminating the cantilever. That beam would be astronomically (a technical engineering term lol) large for a 26' span holding up a second floor and an addition's roof, so without very complicated detailing, the beam would have a soffit splicing your kitchen into two rooms, right over where you stand at the sink, and there is also the 10'x26' open area next to the kitchen split in two rooms.

More of the floor plan, and probably front elevation, to understand why the Closet is bumped out on front, and no windows on the front elevation (assume front per plan on other thread), and skylights/vault suggest a single slope roof in combination with that Closet bumpout. Also, might be opportunity to adjust the laundry by flipping it's door/closet which will allows the shower to take the Makeup area spot. The shower is a bit strange to begin with by being 7' deep in the wrong direction based on the showerhead location.

Post and run.

Since your summer was dry, I would want to rule out a slow hidden leak before assuming it is just humidity. Take a look in the attic right above that hallway after a rain and check for damp insulation or stains on the roof deck. A cheap pin moisture meter pressed against the ceiling will also tell you if the drywall is still actively wet. If both come back clean, then it is just surface mildew and the humidity fix will do the trick.
Would need to see pictures to see the extent. A water leak most likely shows on the ceiling, not the walls, and has a very distinct pattern compared to being caused from moisture.
It isn't important about the rooms on the hallway, but the attic. Like whether the HVAC unit and supply ducts are there (first said slab, but also basement), whether you have storage, whether you have enough insulation, whether you have enough passive attic ventilation, whether the bath exhausts discharge outside. Also unclear description about return vents (reads as only 1 but a transfer grille).
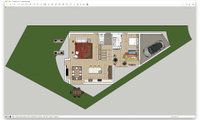
@JUDY GRAHAM Thanks! The ADU position is definitely tricky. While Mom is with us, we wouldn't have the TV or bistro table there, so the passage would be clear. It does encroach her space a bit, but that separate living area is mostly so she can escape the noise and chaos of us without being confined to a bedroom. If we don't need the income generation, then we would use the ADU living area as a TV/rec room, so we'd have access. But yes, as an ADU, we would add a bookcase blocking the garage door and the table blocking the kitchen door; our path from the garage would be to go north along the 5' paved path to the living area entrance. That's far from ideal with groceries.
That's an interesting idea to shift the ADU to where the kitchen is now. I was optimizing for the main house to get the best light and trying to get a natural sound barrier (and generally privacy) for the ADU. But that's a great suggestion that I'll play around with.
Once we find an architect with whom we have any confidence, hopefully they can design a better flow given our preferences and the lot constraints. But without using funky angles.
"Not one of you has given any response to the issue here: does this wedge lot require non-right angles?"
I have offered advice about "angles" and given a schematic of using rectalinear spaces.
The seam mastic at joints is not to worry about. In my experience for many properties over decades, I believe only 1 house had a leak at a corner, and that was from torquing the gutter.
With 10' sectional gutters, that is meant more for the DIYer. On a long run, each section would be sloped "segmented" at the seam, which would be noticeable. With a seamless, you gradually bend to get your slope and it is not as noticeable.
Copper I would only specify with a half-round profile. Painted/galv steel only with a commercial box profile/scuppers that works with other fascia/roof edge detailing.
As far as gutter guards, I have personally not found any style to work in heavy rain, all of them work fine in a light mist - a couple can hold debris on top (sponge and screened holes). But heavy rain is what gutters are for.

People have a knee jerk reaction and slap gutters on a house as a matter of norm, but sometimes if you analyze the house you discover that water management can be handled in an easier, more visually appealing way.
Gutters are a pain to maintain. Sometimes a gutter is needed over an entrance and no where else.

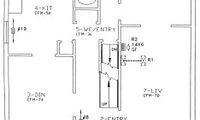
Since my comment sounded wordy and like AI, here's a sketch of what I would consider worth remodeling as "investment," so if you are completely gutting the Kitchen and Powder anyway, move them to be beneficial to most people's lifestyles:

Removing some of the walls could be structurally challenging.
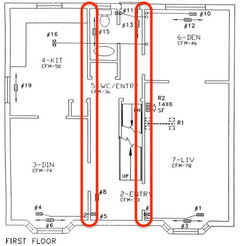
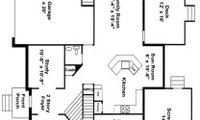
This is an example of what Jan is asking for. It's taken from the Featured Answer in the "New to Kitchens? Read Me First!" thread.
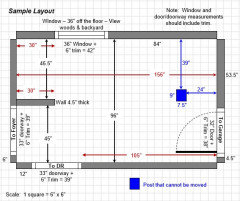
At this stage, it is purely conceptual (though you have to have a handle on proportions and sizes, and be able to picture the floor plan in 3D) so exact dimensions are unnecessary.
The proposed Dining Room does not work well being open to the Family Room in that manner. It creates a "one-sided" furniture layout because of the circulation required to pass through the skinny 14' wide Family Room. And is way oversized and not kitchen-adjacent.
The Game Room/Golf Simulator location would have an odd access being entered from the Kitchen or only outdoor. It probably also needs to have a higher ceiling. Since you don't have a basement, but have a sloping down back yard, I would suggest it be lowered with stairs down into it. I know of a couple examples where the golf simulator was an addition and the house overlooked into it.
The problem this popular builder's plan presents is the angled circulation toward the Family Room, with the stair creating a "skinny" width for a Kitchen (hard to fit the desired island) and a bearing wall/roof change along the Dining Room wall. One solution is to extend the Sun Room (originally a Breakfast Area) out as a full Dining Room.
Also note that you cannot just build a permanent room on top of a deck and be successful, it was not designed for the same purpose.

To be more specific on what is shown and the comments recently noticing, it appears the main bathroom has a 9'-0" ceiling and is 5'-8" wide. Then the shower and flanking closets are 3'-4" wide and under a sloping ceiling.

There is more space that can be captured. It varies depending on the placement/height of the kneewalls related to the roof slope and footprint of the room.
Only a portion of the main bathroom and portion of a shower are required to have a full-height ceiling. That ceiling can also be lowered to 8'-0", and the storage and toilet can be under a sloping roof.
I would agree that for a bunk room, a separate shower/toilet room accessed from a vanity room is appropriate and perfectly functional for simultaneous use.

Not being snarky here, but, 6 people are not going to be in the bathroom at the same time. Design it for one person with a generous vanity, one toilet, and a large shower area with a seat (just in case one of you is in a boot). Use the rest of the space for built-in storage.

Do easy to clean.
For the group, at the lake house, a well designed outside shower will take the burden off one bathroom.

I am going to have an outdoor shower. Many family members are requesting one. Thanks for all of these ideas. They are so terrific! I love creative people.
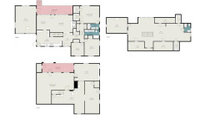

General contractor here. Sigrid is right about the structural engineer, and here's the build-side checklist for the garage itself:
Slab: Garage slabs are usually thinner than house floors, sloped toward the door, and sit lower than the main floor. Plan on building the floor up with insulation and subfloor to match the house level.
Garage door opening: Filling it in needs real framing and support at the base, not just studs and siding. It's also where the exterior look gets decided, so plan windows or glass there on purpose.
Bathroom: Putting it on the kitchen-side wall is the right call. Plumbing in a slab means saw-cutting it for drain lines, so shorter runs save real money. A slab also makes a zero-entry shower easier to recess than a raised wood floor does, though it means chipping concrete, so budget for it.
Dining-room opening: Confirm whether that wall is load-bearing before you decide where the door goes.
Code: A bedroom needs a code-size egress window or door, smoke/CO alarms, heating and cooling, and energy-code insulation. Some cities also require replacement parking. Call your building department early, since rules vary by city.
Get drawings and the engineer's input first, then design the layout around what the structure allows.
The bedroom door should not have direct access to the Dining, there should at least be a "vestibule/ante room" or short hallway. The garage slab appears to be lower than the house, so a step/ramp, raising the floor elevation, and if there is conflict with the ceiling height and front wall height because of one of those choices, should be planned for.
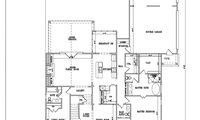
Some comments:
- Just solving for a larger Living/Guest, make the bathroom a standard 5'x7'-?" (78" long is minimum) layout. Trying to understand your access statement I show the bathroom as fully open to the hallway, but that conflicts with having a Powder Room elsewhere in the house.
- The Living Room has a conflict with the French doors. If you lay out furniture based on the fireplace you have no circulation to outdoors. Such is the problem with perfect symmetry focused at the centerline. Place a door(s) in line with the Foyer view, or inside the Breakfast Room.
- The Mudroom should have a window, even if a transom, otherwise it's a long dark hall.
- Some of the doorway openings should be addressed. A "closed concept" layout does not mean that you have to have small doorway sizes to each room. Just a short return, enough for the casing size, will visually make each room feel like separate rooms. What is more important in detailing is how these openings align, what you see through these openings, and how those openings restrict/control circulation or visual access.
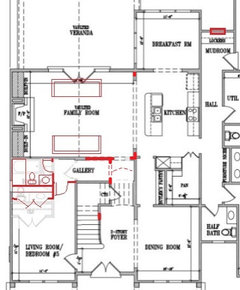

" A pocket door on the bath could also save the swing space "
Worst idea, nothing good happens with a pocket door on a bathroom, especially one in close proximity to the family room.
Any door's "swing space" will be within the space required to get people and/or equipment through the doorway; it does not save anything.

I assume resurrecting your thread means the DG is still ponding and sloping the surface was not chosen as a solution.
It is unclear if the "ditch" you describe gravity discharges anywhere. If it is just dug under the DG area with no where for the water to move to, then it is just a bathtub if your surrounding subbase soil is clayey. Realize that water enters this "ditch" not just from the DG above it, but simultaneously from the surrounding soil when the soil becomes saturated during times that the DG is waterlogged (during rain).
You also don't state the type of 4"-8" deep rock in the "ditch," whether it's clean and the AASHTO designation. Those are critical specs.
DG will harden enough to have properties similar to concrete. But, it will still allow water to pass, as your container experiment testifies. If you do have a french drain below the DG (that's exactly what the "ditch" you've created technically is, as long as it can discharge somewhere), then the DG will drain, and a bit quicker from capillary action.
A term that is not mentioned here nor did I see it in the quick skim of Tapla's post, is sieve. That is what is being described in a round-about way.
I didn't miss any point, except what the purpose of this thread was. It seemed you still had a problem, and I was trying to solve it. Guess that's not what this was meant for, so carry on.

@3onthetree I never posted to the thread about my decision to replace the decomposed granite until today. I should have included that update in my prior post, and I apologize for any misdirection.
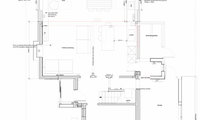
there isn’t room for a very wide island, not if i am to keep the sofa close to it. that’s part of the reason i hadn’t placed cooker of island on it. I see your point that if you lose the seats it doesn’t matter. as i’m facing southwest, the sun can be very low and direct around this time of year so a second seating area further back from the windows made sense originally but it definitely leads to a less than ideal kitchen layout
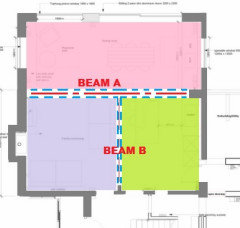
You've confirmed that each beam will protrude down below the ceiling plane. That creates 3 distinct visual spaces. Which makes the exterior wall fenestration odd if it does not follow any sort of design lines of those spaces. It is also odd for individual spaces to cross over these separations. And, Beam B intersecting into Beam A, without a column, is unnatural looking.
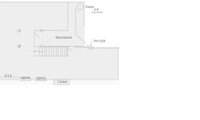

Not enough info, no dimensions.
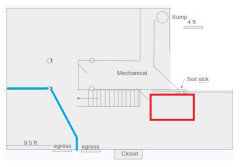
Not nearly enough info and the drawings are too primitive. But in concept only, something that incorporates the Emergency Escape and Rescue Opening better into the room (BLUE). Bath near stack (RED).

This a crazy thread. The picture is provided. It is a normal install. I guess everyone commenting has an undermount on granite so this is a foreign situation.
I would purchase DUROSOL 0.375 in. D x 39 in. W x 39.36 in. L-Shape Stainless Steel Natural Molding and Transition Trim.
- Cut the trim to the width of the sink.
- DO A DRY FIT: PUSH THE TRIM DOWN INTO THE GAP -- LONG SIDE AGAINST THE WALL -- TO MAKE SURE THE TRIM WILL FILL THE GAP BETWEEN THE SINK AND THE WALL. THE TRIM -- SHORT SIDE -- SHOULD BE FLUSH WITH THE SINK.
- Pull out the trim.
- IF THE TEST WAS SUCCESSFUL, apply a bead of clear silicone adhesive to the wall side of the gap (it will hold the trim in place). Apply beads of silicone caulk to the front and side edges of the trim (they will prevent water from leaking under the trim).
- Push the trim down into the gap -- long side against the wall -- until it's flush with the sink.
-- not an expert
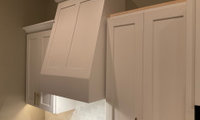
For the cabinet crown, it's a very simple solution. Cut it flush so it doesn't protrude around the hood. It probably requires a return block behind the crown (think of an end cap on a gutter how it closes it off).
How high is the ceiling? Is it vaulted? To me, cabinets that don’t go up to the ceiling look awkward and cut off. The hood protruding above them emphasizes this awkwardness.
Since the hood is slanted and won’t be flush with the cabinets, i think putting molding on it that matches the cabinets is what makes it look odd. i would remove the molding from the hood and make it smooth so the hood is distinguished from the cabinets rather than looking like a mistake.
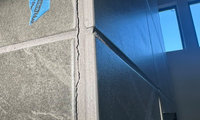
The 11th tile probably occurs around the framing platform. Settling (wood shrinkage) of even 1/8" wouldn't be concerning but enough to crack a grout line.
Wood framing instead of steel is your problem. I'd grind it out, refill it, and hope your framing is done drying out.