Popular Houzz Series
Popular Houzz Series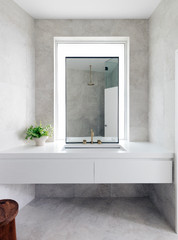
Appears in
See also
Fun HouzzFrom The ProsHouzz Around The WorldProject Of The WeekStickybeak Of The WeekQuizzesCreatives At HomeAt Home With...Best Of The WeekRoom Of The WeekDesigner Profiles3 Things I Wish My Clients KnewHow Do I...Buyer's GuidesExpert EyeInnovation AlertSo Your Style Is...Spotted!Picture PerfectBefore & AfterBudget BreakdownHome TimeMade Local
Room Of The Week
Room of the Week: A Reader's Bathroom Inspired by Houzz
When you're planning a new bathroom, where do you look for ideas? Houzz, of course! See how this reader did it

In this Room of the Week, we step inside a reader’s renovated bathroom, which was inspired by a selection of beautiful images on Houzz. “I bought the house in 2014 – I just loved how different it was,” says homeowner and real estate agent, Lyn Earle. “We were a blended family at the time with five children and needed a large house. With six bedrooms, there was enough room for everybody. It was a mess and was painted dirty green with yellow gutters.” Read on to discover how she transformed it.
Using my Houzz Ideabooks as inspiration, I designed everything in this bathroom myself. In a word, I wanted this bathroom to be Zen. I wanted a spa-like feel with a little bit of fantasy and an indoor-outdoor connection. Being a real estate agent, I also knew the space had to be practical enough for everyday use. It needed to blend with the rest of the house too, which features a lot of timber.
One of my biggest challenges was transferring the ideas in my head into a builder’s reality. Fortunately, I was able to show the builders my Houzz images as a way to explain what I wanted.
Once works started, everything that was possible to do myself, I did, including painting, removing the deck, basic plastering, deck oiling and concreting,” she says. And Earle is thrilled with the result of her efforts – read on to discover how images found on Houzz inspired her beautiful new bathroom every step of the way.
The bathroom before works.
When I bought the house the bathroom wall didn’t go all the way up to the ceiling, so when someone was in the shower all the steam would flow straight into the hallway. Also, everyone in the house could hear everything going on in the bathroom!
Inspired to redo your bathroom? Find a bathroom designer near you on Houzz
Houzz inspiration image
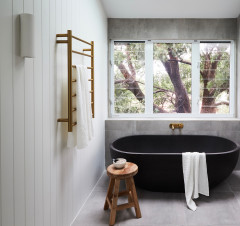
I loved this Houzz image because of the way the bath makes a very separate statement and feels like an oasis to sink in to. I also love the way the pebbles make the bath stand out and create that spa-like feel. I was also drawn to the louvred windows and the warm, natural feel of the textured feature wall.
I loved this Houzz image because of the way the bath makes a very separate statement and feels like an oasis to sink in to. I also love the way the pebbles make the bath stand out and create that spa-like feel. I was also drawn to the louvred windows and the warm, natural feel of the textured feature wall.
Olivia oval freestanding bath in Gloss White; Realonda Ceramica Delta 320 x 320-millimetre feature wall tiles in Matt Black: Manago Tiles; NCIA Kierrastone 450 x 450-millimetre floor tiles in Ash: Manago Tiles.
The finished bathroom
Using the Houzz image as inspiration, I added a freestanding bath to my bathroom, with pebbles underneath it and a dramatic tiled feature wall.
The room is an unusual shape. It was a challenge to get the shower and bath on the outside wall of the building so the courtyard and inside-outside shower could happen, while allowing room for a walkway to the outside.
With masking tape, I marked out the floor with all the elements that had to go in; for example, the vanity, toilet, bath, shower space and walkway, and stood and stared at it for a week.
I also needed to make sure there were enough tiles at the front of the toilet so people wouldn’t be walking on pebbles, and I had to make sure that the size of the tiled, timber and pebbled areas were balanced.
The 10- to 50-millimetre black pebbles from Bunnings were the biggest bargain of this renovation. I needed about 10 bags to go under the bath and vanity. I then added concealed lighting above the mirror and under the vanity to light up the pebbles at night.
Houzz inspiration image
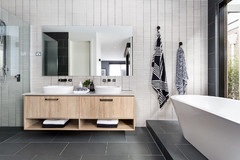
I really loved the randomness of the timber under the bath and how it blends flush with the tiles. I didn’t actually end up using this idea in its pure form, but I integrated tiles and timber flush in my bathroom.
I really loved the randomness of the timber under the bath and how it blends flush with the tiles. I didn’t actually end up using this idea in its pure form, but I integrated tiles and timber flush in my bathroom.
Tasmanian oak timber flooring with a Wattle New Baltic Pine stain; cedar with exposed beams painted in Night Sky: Dulux.
The finished bathroom
I think the timber walkway sitting flush with the tiles is very similar to my Houzz inspiration image, as is the grey and yellowish timber combo.
I’m a very visual person so I laid the Tasmanian oak boards on the floor, moved them about and changed the width until I was happy with the effect. The timber walkway needed to meet the outside wall right where the door opened, while not being so wide it impinged on the shower space, all while leaving enough room for the pebbles.
I sanded and finished the bathroom walkway and timber courtyard, laid the pebbles, oiled the cedar ceiling, sealed the shower timber and did the painting. The builder built the walkway and the courtyard. I hired a professional tiler and plumber.
Houzz inspiration image
I just loved the big glass wall in this image, as well as the private outdoor space – so very Zen and relaxing.
Browse more images of beautifuil bathrooms on Houzz
I just loved the big glass wall in this image, as well as the private outdoor space – so very Zen and relaxing.
Browse more images of beautifuil bathrooms on Houzz
Doors and louvres: Everclear Windows and Doors.
The finished bathroom
To create a similar effect, I added tall 2.7-metre bi-fold doors and ran them the full width of the wall, adding a feature panel of louvres.
I wanted the courtyard wall to be a sort of butterfly shape rather than straight and square. I also wanted to link back to the timber features inside.
I sanded and coated the deck and fixed a broken water feature that I bought very cheaply, which I then set up to operate on solar with a back-up battery so it can run constantly without swallowing up power.
Houzz inspiration image
I always wanted to blend timber with modern, industrial blacks and greys, which this Houzz image captures.
I wanted the shower to go right on the back wall to give you the sense of showering outside. Also the rest of the home’s interior features a lot of timber wall cladding, so adding timber in the bathroom tied the rooms of the house together.
Nouveau 1500-millimetre vanity in Matt Black: Rifco; basins: Solis Luxcrete concrete integrated basins: Rifco.
The finished bathroom
I used rose ash timber for the shower wall, which I recycled from walls elsewhere in the house – I love repurposing wherever I can. The wall was sealed and the area behind it waterproofed. We glued the wall to maintain the integrity of the waterproofing. It should be easy to remove if it needs to be refinished at any time.
Another thing I was very fussy about is that I like renovations to be seamless and didn’t want to have to step up onto new tiles from an existing hallway. The bathroom had three different levels that all needed to line up as one seamless, flush floor. The solution was to remove the original floor and lower all the bearers so there is a smooth transition from hallway carpet to tiles, timber and rocks.
Yes, the builders thought I was mad but it was so worth it.
Yes, the builders thought I was mad but it was so worth it.
Houzz inspiration image
This was a more general picture for me. I was looking at the pathway through the courtyard and the timber elements. Unfortunately, it was a much larger space than I had and didn’t really work for me.
But I loved the way the outside has been integrated inside and the timber slats on the roof. It is so green and luscious; I think my bathroom ended up a bit more edgy.
Corten metal screen; Night Sky paint: Dulux.
The finished courtyard
It was important to me that the courtyard was at the same level as the bathroom and showed as much outside greenery as possible without sacrificing privacy.
The house is full of angles, so I made sure the courtyard wall was also angled. It actually dips down in one spot, which gives you a perfect view of a huge tree in the backyard when you’re lying in the bath. For added impact, I have lit up the branches of the tree. It’s awesome at night with the door open when there’s a cool breeze flowing over your shoulders.
I found the stools in Spotlight for AU$25 and stained them with Black Japan. There are also solar lanterns and lights that make the courtyard look like a fairyland at night.
Your turn
Are you as impressed with this reader’s bathroom makeover as we are? Tell us in the Comments below. And don’t forget to save your favourite images for your own renovation inspiration, like this story and join the conversation.
More
Want to see another bathroom transformation? Don’t miss this Room of the Week: A Bathroom That Lets Nature Steal the Show
Who lives here: A homeowner and her two dogs
Location: Grose Vale, NSW
Year of work: 2022
Scope of works: A main bathroom measuring 15.4 square metres (including the courtyard area)
Budget: Around AU$25,000 for the bathroom and courtyard
Builder: GW and JC Marshall Constructions
Metalwork: T and L Metalworks
Bath and tapware supplier: My Homeware
They were tough times and there was no money for any sort of renovation, so I just used to get on my computer and pore over pictures on Houzz looking for ideas, saving Ideabooks for every room in the house. Houzz is so expansive that I didn’t need to go anywhere else for ideas. I also loved how when you save an Ideabook, you don’t lose the images when you log off. It’s a gem of a site.