Bathroom Design Ideas with an Undermount Sink and Marble Benchtops
Refine by:
Budget
Sort by:Popular Today
21 - 40 of 62,095 photos
Item 1 of 3
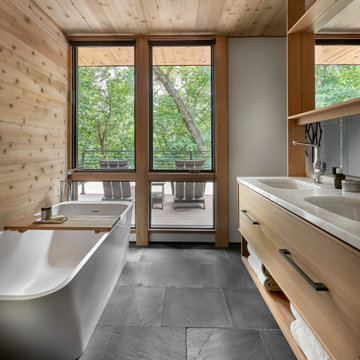
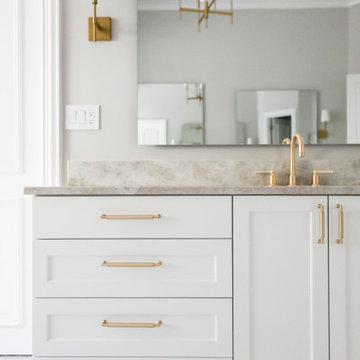
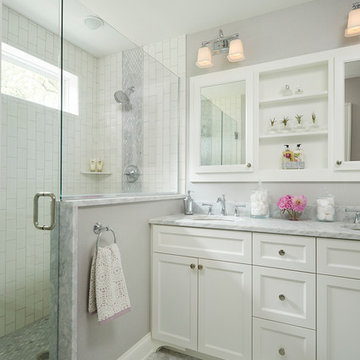
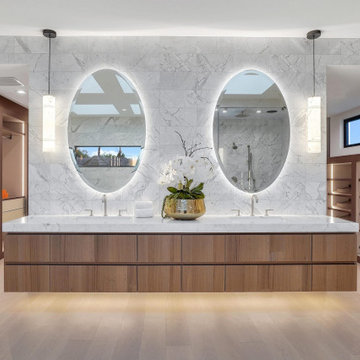
The soaking tub was positioned to capture views of the tree canopy beyond. The vanity mirror floats in the space, exposing glimpses of the shower behind.
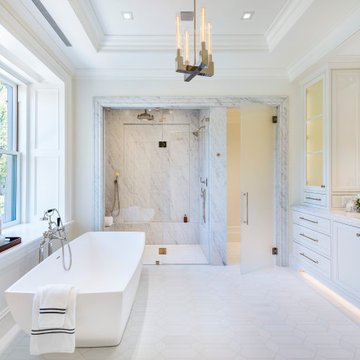
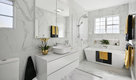
Stunning master bath with custom tile floor and stone shower, countertops, and trim.
Custom white back-lit built-ins with glass fronts, mirror-mounted polished nickel sconces, and polished nickel pendant light. Polished nickel hardware and finishes. Separate water closet with frosted glass door. Deep soaking tub with Lefroy Brooks free-standing tub mixer. Spacious marble curbless shower with glass door, rain shower, hand shower, and steam shower.
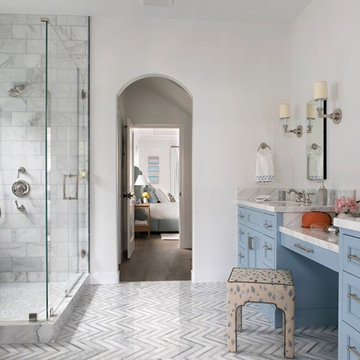
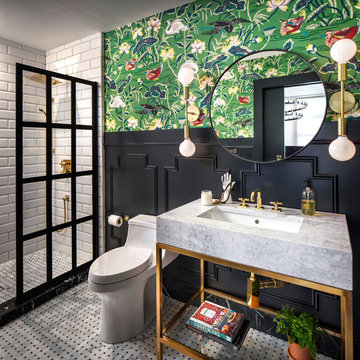
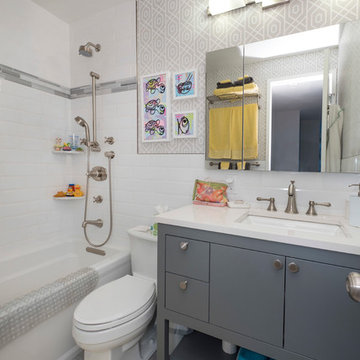
These young hip professional clients love to travel and wanted a home where they could showcase the items that they've collected abroad. Their fun and vibrant personalities are expressed in every inch of the space, which was personalized down to the smallest details. Just like they are up for adventure in life, they were up for for adventure in the design and the outcome was truly one-of-kind.
Photos by Chipper Hatter
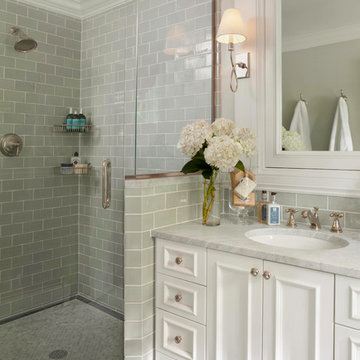
This master bath was expanded and transformed into a light, spa-like sanctuary for its owners. Vanity, mirror frame and wall cabinets: Studio Dearborn. Faucet and hardware: Waterworks. Drawer pulls: Emtek. Marble: Calcatta gold. Window shades: horizonshades.com. Photography, Adam Kane Macchia.
This remodel went from a tiny story-and-a-half Cape Cod, to a charming full two-story home. The Master Bathroom has a custom built double vanity with plenty of built-in storage between the sinks and in the recessed medicine cabinet. The walls are done in a Sherwin Williams wallpaper from the Come Home to People's Choice Black & White collection, number 491-2670. The custom vanity is Benjamin Moore in Simply White OC-117, with a Bianco Cararra marble top. Both the shower and floor of this bathroom are tiled in Hampton Carrara marble.
Space Plans, Building Design, Interior & Exterior Finishes by Anchor Builders. Photography by Alyssa Lee Photography.
Design by Carol Luke.
Breakdown of the room:
Benjamin Moore HC 105 is on both the ceiling & walls. The darker color on the ceiling works b/c of the 10 ft height coupled w/the west facing window, lighting & white trim.
Trim Color: Benj Moore Decorator White.
Vanity is Wood-Mode Fine Custom Cabinetry: Wood-Mode Essex Recessed Door Style, Black Forest finish on cherry
Countertop/Backsplash - Franco’s Marble Shop: Calacutta Gold marble
Undermount Sink - Kohler “Devonshire”
Tile- Mosaic Tile: baseboards - polished Arabescato base moulding, Arabescato Black Dot basketweave
Crystal Ceiling light- Elk Lighting “Renaissance’
Sconces - Bellacor: “Normandie”, polished Nickel
Faucet - Kallista: “Tuxedo”, polished nickel
Mirror - Afina: “Radiance Venetian”
Toilet - Barclay: “Victoria High Tank”, white w/satin nickel trim & pull chain
Photo by Morgan Howarth.
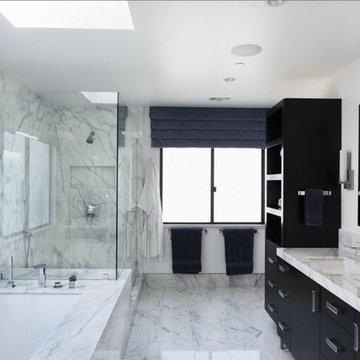
Large and modern master bathroom primary bathroom. Grey and white marble paired with warm wood flooring and door. Expansive curbless shower and freestanding tub sit on raised platform with LED light strip. Modern glass pendants and small black side table add depth to the white grey and wood bathroom. Large skylights act as modern coffered ceiling flooding the room with natural light.
An Arts & Crafts Bungalow is one of my favorite styles of homes. We have quite a few of them in our Stockton Mid-Town area. And when C&L called us to help them remodel their 1923 American Bungalow, I was beyond thrilled.
As per usual, when we get a new inquiry, we quickly Google the project location while we are talking to you on the phone. My excitement escalated when I saw the Google Earth Image of the sweet Sage Green bungalow in Mid-Town Stockton. "Yes, we would be interested in working with you," I said trying to keep my cool.
But what made it even better was meeting C&L and touring their home, because they are the nicest young couple, eager to make their home period perfect. Unfortunately, it had been slightly molested by some bad house-flippers, and we needed to bring the bathroom back to it "roots."
We knew we had to banish the hideous brown tile and cheap vanity quickly. But C&L complained about the condensation problems and the constant fight with mold. This immediately told me that improper remodeling had occurred and we needed to remedy that right away.
The Before: Frustrations with a Botched Remodel
The bathroom needed to be brought back to period appropriate design with all the functionality of a modern bathroom. We thought of things like marble countertop, white mosaic floor tiles, white subway tile, board and batten molding, and of course a fabulous wallpaper.
This small (and only) bathroom on a tight budget required a little bit of design sleuthing to figure out how we could get the proper look and feel. Our goal was to determine where to splurge and where to economize and how to complete the remodel as quickly as possible because C&L would have to move out while construction was going on.
The Process: Hard Work to Remedy Design and Function
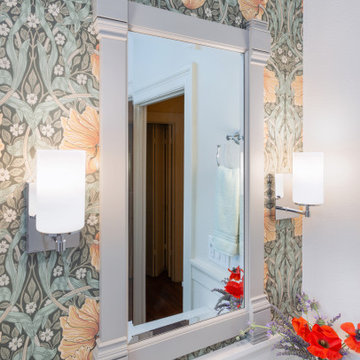
During our initial design study, (which included 2 hours in the owners’ home), we noticed framed images of William Morris Arts and Crafts textile patterns and knew this would be our design inspiration. We presented C&L with three options and they quickly selected the Pimpernel Design Concept.
We had originally selected the Black and Olive colors with a black vanity, mirror, and black and white floor tile. C&L liked it but weren’t quite sure about the black, We went back to the drawing board and decided the William & Co Pimpernel Wallpaper in Bayleaf and Manilla color with a softer gray painted vanity and mirror and white floor tile was more to their liking.
After the Design Concept was approved, we went to work securing the building permit, procuring all the elements, and scheduling our trusted tradesmen to perform the work.
We did uncover some shoddy work by the flippers such as live electrical wires hidden behind the wall, plumbing venting cut-off and buried in the walls (hence the constant dampness), the tub barely balancing on two fence boards across the floor joist, and no insulation on the exterior wall.
All of the previous blunders were fixed and the bathroom put back to its previous glory. We could feel the house thanking us for making it pretty again.
The After Reveal: Cohesive Design Decisions
We selected a simple white subway tile for the tub/shower. This is always classic and in keeping with the style of the house.
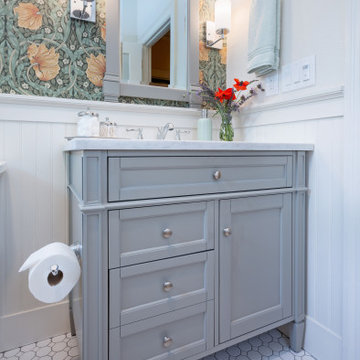
We selected a pre-fab vanity and mirror, but they look rich with the quartz countertop. There is much more storage in this small vanity than you would think.
The Transformation: A Period Perfect Refresh
We began the remodel just as the pandemic reared and stay-in-place orders went into effect. As C&L were already moved out and living with relatives, we got the go-ahead from city officials to get the work done (after all, how can you shelter in place without a bathroom?).
All our tradesmen were scheduled to work so that only one crew was on the job site at a time. We stayed on the original schedule with only a one week delay.
The end result is the sweetest little bathroom I've ever seen (and I can't wait to start work on C&L's kitchen next).
Thank you for joining me in this project transformation. I hope this inspired you to think about being creative with your design projects, determining what works best in keeping with the architecture of your space, and carefully assessing how you can have the best life in your home.
An Arts & Crafts Bungalow is one of my favorite styles of homes. We have quite a few of them in our Stockton Mid-Town area. And when C&L called us to help them remodel their 1923 American Bungalow, I was beyond thrilled.
As per usual, when we get a new inquiry, we quickly Google the project location while we are talking to you on the phone. My excitement escalated when I saw the Google Earth Image of the sweet Sage Green bungalow in Mid-Town Stockton. "Yes, we would be interested in working with you," I said trying to keep my cool.
But what made it even better was meeting C&L and touring their home, because they are the nicest young couple, eager to make their home period perfect. Unfortunately, it had been slightly molested by some bad house-flippers, and we needed to bring the bathroom back to it "roots."
We knew we had to banish the hideous brown tile and cheap vanity quickly. But C&L complained about the condensation problems and the constant fight with mold. This immediately told me that improper remodeling had occurred and we needed to remedy that right away.
The Before: Frustrations with a Botched Remodel
The bathroom needed to be brought back to period appropriate design with all the functionality of a modern bathroom. We thought of things like marble countertop, white mosaic floor tiles, white subway tile, board and batten molding, and of course a fabulous wallpaper.
This small (and only) bathroom on a tight budget required a little bit of design sleuthing to figure out how we could get the proper look and feel. Our goal was to determine where to splurge and where to economize and how to complete the remodel as quickly as possible because C&L would have to move out while construction was going on.
The Process: Hard Work to Remedy Design and Function
During our initial design study, (which included 2 hours in the owners’ home), we noticed framed images of William Morris Arts and Crafts textile patterns and knew this would be our design inspiration. We presented C&L with three options and they quickly selected the Pimpernel Design Concept.
We had originally selected the Black and Olive colors with a black vanity, mirror, and black and white floor tile. C&L liked it but weren’t quite sure about the black, We went back to the drawing board and decided the William & Co Pimpernel Wallpaper in Bayleaf and Manilla color with a softer gray painted vanity and mirror and white floor tile was more to their liking.
After the Design Concept was approved, we went to work securing the building permit, procuring all the elements, and scheduling our trusted tradesmen to perform the work.
We did uncover some shoddy work by the flippers such as live electrical wires hidden behind the wall, plumbing venting cut-off and buried in the walls (hence the constant dampness), the tub barely balancing on two fence boards across the floor joist, and no insulation on the exterior wall.
All of the previous blunders were fixed and the bathroom put back to its previous glory. We could feel the house thanking us for making it pretty again.
The After Reveal: Cohesive Design Decisions
We selected a simple white subway tile for the tub/shower. This is always classic and in keeping with the style of the house.
We selected a pre-fab vanity and mirror, but they look rich with the quartz countertop. There is much more storage in this small vanity than you would think.
The Transformation: A Period Perfect Refresh
We began the remodel just as the pandemic reared and stay-in-place orders went into effect. As C&L were already moved out and living with relatives, we got the go-ahead from city officials to get the work done (after all, how can you shelter in place without a bathroom?).
All our tradesmen were scheduled to work so that only one crew was on the job site at a time. We stayed on the original schedule with only a one week delay.
The end result is the sweetest little bathroom I've ever seen (and I can't wait to start work on C&L's kitchen next).
Thank you for joining me in this project transformation. I hope this inspired you to think about being creative with your design projects, determining what works best in keeping with the architecture of your space, and carefully assessing how you can have the best life in your home.
Bathroom Design Ideas with an Undermount Sink and Marble Benchtops
2