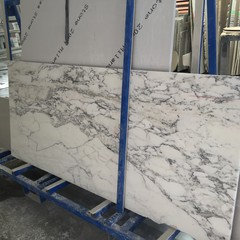
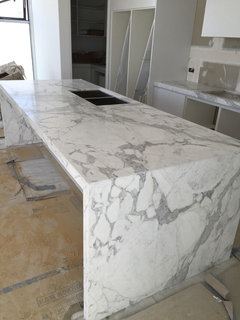
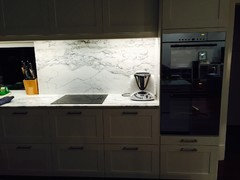
Marble island and splashback dilemma
Miki
8 years ago

Featured Answer
Sort by:Oldest
Comments (58)

Miki
8 years agoRelated Discussions
Kitchen Trends 2016/2017 – The Latest Kitchen Talk
Comments (1)The all black kitchen looks scary as. Maybe because there's no lightness in there at all....See Moredo tongue and groove and marble mix?
Comments (0)I love the look of Tand G as the real thing or the 'James Hardie' NZ groove panels..........but also want my ensuite to look opulent. I am not having tiling anywhere in this room, which would be the easiest solution. Hence my dilemma..... I already have chosen the white 'tile look' acrylic walls with a feature 'marble' (narrow) panel in the shower alcove enclosure from the 'Atlantis' range. The alcove covers the complete width of the bathroom so is a feature in itself. I wanted to bring the 'marble 'feature' into the room if I could to enhance the opulence. The marbling is minimal veining on a white background so not too dramatic a feature. The obvious area is to use a matching 'marble' vanity top and/or a splash back (especially if have a china vanity top, which is the more likely due to cost). Where should the splashback end at the sides? I thought about taking the 'marble' splashback above the mirror to the ceiling thus creating a similar panel feature to that in the shower albeit wider but don't know how much wider it should be than the vanity. Also What then to do on the rest of the wall(s)? Just painted gib? If I used T& G or groove panelling I would want it to reach the ceiling. So do I put T&G on on all walls? The vanity wall has approx 1000mm 'strips' of full wall either side and the strips below the vanity and above mirror if only a splashback is incorporated. The opposite wall is almost taken up by window, radiator below, btw toilet and towel rail, leaving little wall to 'feature' and then the remaining wall is narrow (only 1100 left after door). These remaining walls could just be left as painted gib of course as really cannot afford to take the 'marble' panelling anywhere else in the room nor think where else it would feature best. 'Marble' Flooring is a possibility but it would need to be vinyl not porcelain tiles. Having written all this down I think I have talked myself out of T&G on any of the walls as the narrow room would become too busy and bitty but am still interested in what others think....See Moreanother kitchen colour dilemma !
Comments (3)What about colour , character and personality ? A splashback with a pond and a tree may be great , or look naff , as the Poms would say . Potentially , its on the right track , but look at pic 3 . Gone to sleep yet ? Probably $30k spent on nothingness . Now look at pic 3 , and imagine your splashback . Even if it is ( cringe ) black and white too , it will actually add to it . A bit . I don't like the particular light used in pic 1 , but its got character , you notice it , it is not totally bland . Pic 3 is ....See MoreMaximising Space in a small kitchen
Comments (0)Modern, sophisticated and lively were the key deliverables for this city suburb townhouse. The overall scope involved an upgrade to the open plan kitchen, dining and living areas including flooring, wall colour, curtains and kitchen joinery. Modernising the space through new colours and materials was the focus, without having to extensively rearrange the layout. This Mt Victoria Kitchen is now a refreshing, well functioning and lighter space. The well balanced combination of timbers, light marble tones and splashes of colour and pattern, such as the soft blue, hexagonal splashback, bring a delicate energy to the top floor. Before: After: Creating access to storage on both sides of the lounge facing island bench. The cupboards behind the dining table are minimal looking and tucked away to appear as panels, but allow for extra storage behind. The open timber shelves create an area for book storage and display, which improves the view from the lounge/dining direction. This breaks up what otherwise would have been a very deep, unusable storage if it were only to be accessed from the kitchen side. Before: After: Open timber shelves above the island on the end, offering a more accessible storage from the dining side of the room. At the same time this was a great opportunity to add in an extra area for display to further improve the view onlooking the kitchen. Before: After: The new kitchen design included tweaking small areas of cabinetry and maximising the available space, whilst also incorporating design features that didn’t compromise any of these functional gains. Before: After: Even with a sloping ceiling and staying within the existing footprint, the new kitchen looks fresh, the space is more streamlined and is easier to use. Before: With the number of corners in this layout it was important that storage space wasn’t lost in these areas. After: Using speciality corner fittings that rotate and extend to improve the access to the deep corner spaces was a must-have solution here....See MoreMiki
8 years ago PRO
PROBrilliant Design Concepts
8 years ago
d m
8 years ago PRO
PROVSL Joinery
8 years ago- PRO
User
8 years ago  PRO
PROTwinkle and Whistle
8 years ago PRO
PROAlix Helps Interiors
8 years agolast modified: 8 years ago
katdimitriadi
8 years ago
Jen James
8 years ago
Angela Ris
8 years agowedgelee
8 years ago
lettiepayne
8 years ago
Joanna Kouskousis
8 years ago
Deb Xuereb
8 years agobargainhunter
8 years agomeryllarsen
8 years agoA P
8 years agoMiki
8 years ago
vickimpond
8 years ago PRO
PROReclaim your space
8 years ago
Gioenne Rapisarda
8 years agoJoanna Kouskousis
8 years ago PRO
PRO3 Pea's Property Styling
8 years agoMiki
8 years ago PRO
PROJamesjames Design
8 years ago PRO
PROKitchen FX
8 years ago
Emma
8 years ago PRO
PROProjectile Ltd
8 years ago
how2girl
8 years agoMiki
8 years agoDeb Xuereb
8 years ago
Kate P
8 years ago
cloudpants
8 years agoMiki
8 years agoTilly
8 years agoa_scholten
7 years agoecl24
7 years agoecl24
7 years ago- PRO
Sun Renovation
7 years ago - PRO
Sun Renovation
7 years ago 
KK1000
7 years agoUser
5 years agomargomelb
5 years agoTilly
5 years ago


Joanna Kouskousis