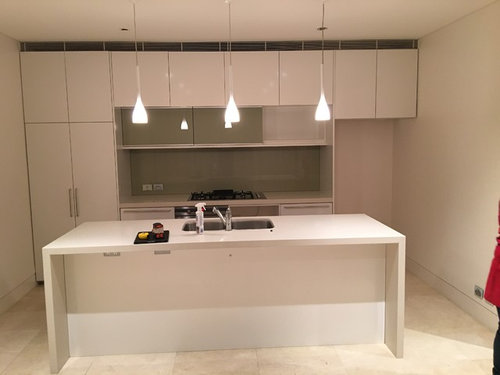
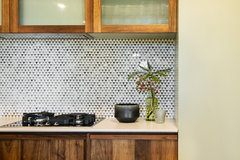
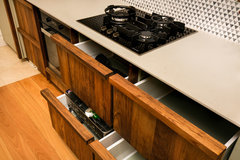
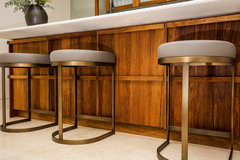
Before & after: a bespoke timber kitchen
JAYEN INNOVATIONS PTY LTD
5 years ago
last modified: 5 years ago

Featured Answer
Sort by:Oldest
Comments (7)
 PRO
PROJAYEN INNOVATIONS PTY LTD
5 years agoRelated Discussions
Not sure where to start!
Comments (49)Thanks for the replies! My wife suggested we talk to a local real estate agent, so i think that is a good idea... just that Im not sure how helpful they are likely to be if we arent selling yet :) As for saving for our dream house, I dont disagree, however if doing this up nicely over the next ~5 years or so while we live here nets us some extra in the eventual sale, then that of course will help us as well. Interesting thing happened today actually. I got a knock on the door and one of the older neighbours asked if he could take some lemons from the tree. I of course said yes. Anyway he was telling me he had lived in the street for 40 years. I asked him if the house had always looked like this, and he said no that ~30 years ago the old old owner did a massive renovation and pulled off the timber and put up the bricks and gutted the inside of the house. Interesting stuff!...See MoreStunning kitchen makeover - before & after
Comments (0)Nick and Rie wanted to up lighten and modernise their tired kitchen space without compromising on storage and functionality. Their outdated kitchen had cream coloured cabinetry & terracotta tiles on the floor. It was given a stunning black and white makeover by Kitchen Mania! The black handles on white cabinetry are a bold statement and the kitchen is finished with an engineered stone bench top with a waterfall end. The geometric tiles and subtle timber elements in the lighting and stools complement this kitchen perfectly. BEFORE AFTER Let us know what you think!...See MoreKitchen Makeover - Before and After
Comments (0)Miramar Kitchen Makeover Getting from a Then to a Now takes commitment and we could not be happier for our delightful clients. They tell us they pinch themselves every morning and what an utter privilege it has been to contribute to a space filled with joy. Before: After: As with any meaningful transformation, this one started with thoughtful consideration of space planning. This previously busy space now feels relaxing and spacious whilst also adding a laundry, having more kitchen storage AND accommodating uncluttered display features. It's a great example of the power of a good layout and bringing in the light :-) Before: After: One 21sqm room contains three zones that are cohesive but also occupy a distinct space practical for their function. The new kitchen layout is a galley (meaning no corners), the dining table that was against a wall is now centralised giving access from all sides, and a laundry occupies a corner formally filled with unused fireplace. Before: After: The new layout is a galley style kitchen with the main benchtop extending the full length of the outer wall. It comfortably accommodates space for a long working bench, storage cabinetry, main kitchen appliances, as well as the contained laundry unit. No corner goes wasted with this particular layout. Tall elements such and fridge freezer and pantry are located on the opposite wall so they don’t block light or views. Adjusting the existing windows allowed for maximum bench space and a clear wall for cabinetry, hob and extractor as well as a succinct shape for a feature tile. Before: After: The former kitchen and dining room didn’t utilise the space as efficiently as it could. We removed the fireplace, reconfigured the room layout, added a laundry, tweaked existing windows to allow for a more open and accessible kitchen design and brought more natural light into the space through skylights. Before: After: NEW LAUNDRY The ‘Laundry in a Cupboard’ is in an accessible area with plenty of room around it when in use but able to be shut away and appear as one with the kitchen. SPECIFIC FEATURES • Enclosed cupboard space to fit washing machine and ventless dryer. • Space to accommodate a dirty laundry basket and a laundry basket for clean washing. • Tall and narrow cupboard for ironing board, floor mop and Dyson vacuum cleaner. • Higher additional shelving for infrequently used storage e.g. Christmas decorations. Before: After: SKYLIGHTS The wall was able to be used by deleting an ineffectual window and raising the height of another so a bench to run underneath. The natural light was generously supplemented with the inclusion of three fabulous skylights that bathe the whole space in light. Before: After: For this kitchen, the transformation was quite remarkable. The room went from a worn, dim and makeshift set up to a well functioning, modern and attractive space. Before: After: DISPLAY SHELVES The display shelves on the cabinetry corners facing the table create a comfortable feeling for dining, enhanced by the low feature pendant over the inviting round table. Before: After: AESTHETICS The overall palette aimed to be refreshing and a balance of pretty and smart. Some of the key features: ‘Contemporary character’ achieved through matte surfaces and clean lines. Precise, elegant and simple cabinetry. Colours and materials that balance fresh light walls bathed in natural light with cool and warm in balance. Cool tones from the subtle sage green/grey coloured cabinetry and detail in the marble splashback tiles Light, warm timber tones used on floor, furniture and joinery details. Before: After: PENDANT having low over dining table helps to create an intimate gathering space in an open plan area Before: After: OPEN STORAGE The custom timber joinery designed for the tall open shelving unit and above the sink visually create a sense of the space appearing larger. Purposefully placed on the corner of a block of cabinetry, the tall open shelving doesn’t completely block off the view from the dining area. At the same time the open shelving is useful for placing items and small appliances that are frequently used, adding to the range of storage possibilities within the space....See MoreBeachside Home Transformation
Comments (0)A professional couple in beachside St. Heliers wanted to breathe some new life into a kitchen that was not just dated; its tired layout was preventing the leveraging of their gasp-worthy stunning views. They love entertaining so one of the cornerstones of the project was carving out an area around the island that would beckon people to linger, chat and nibble while looking out over Rangitoto. Before: After: The first step in this full redesign required the removal of walls to open up the space which meant the installation of a new support beam that was later skillfully integrated into the subtle white paint in order to not interrupt the clean lines. A palette of oak, greens and gray was selected as a nod to the couple’s personal style that was weaved into other rooms to give a consistency in colour scheme throughout the property. For the kitchen, tiles and carpet were done away with and soft hued timber flooring was laid that will promise durability over time. An island with oak lines to integrate with the flooring and a white stone benchtop was selected to compliment the walls and ceiling for a bright and airy feel. Sliding doors were installed to bring the outside in and invite ocean breezes indoors during warmer months. Olive coloured subway tiles along the backsplash blend beautifully with the pendant lights in the same tone. The wine fridge and a large refrigerator will mean ease of entertaining to hold plenty of goodies for guests. Before: After: In the lounge, existing awkward angles presented a design challenge so it was decided that a reconfiguration was necessary. A custom cupboard answered the need for non-existent storage along with a walk-in wardrobe. A sleek oak bookcase and timber floors connected the room to the kitchen and allowed for elegant storage and display of personal items. The hearth has tiles in soft grey hues of concrete that connect to the kitchen. They are taken up the wall inconsistently to add visual variation. The custom ordered large oak dining room ties the spaces together and seats 8 -10 people making large dinner parties a possibility. The previous peach bathroom was a serious nod to the 1980’s. A single glass paned shower brings convenience without blocking light and the gun metal sink will allow for lots of wear and tear. A large white bath with gun metal fixtures was added and the oak cabinet under the sink completes the look. In the powder room, olive coloured patterned tiles lined the bottom half of the walls and an oak shelf and floors again kept the look and feel cohesive throughout. Before: After: Check out the entire project here!...See More
julie herbert
5 years ago
Michelle W
5 years ago
annb1997
5 years ago PRO
PROAus Joinery Kitchens Pty Ltd
5 years ago

legendaryflame